


Sprinter 144 Van Ceiling Support Structural Kit
Shipping calculated at checkout
Only 3 in stock
*NOTE: Complete Kits are currently being handled through e-mail to make sure all your needs are met & the installation requirements are well understood.
The Moonraker Design Co Sprinter Van Ceiling Structural Kit is a complete framing and support kit for your van. Not only does it significantly increase the structural integrity of your camper van conversion, but it also lays the foundation and make it's easier to build on as well.
Our Kit Consists of 4 main components all of which can be ordered separately or together:
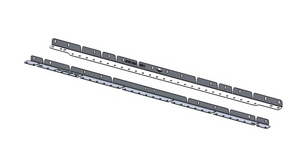
- The wall a ceiling transition structures that keep panels tight at this junction
- The roof rib structures (set of 5x for Sprinter 144WB and 7x for 170WB) that push attachment points out to the side for a more consistent and controlled bolt pattern (1.25" spacing 31.75mm), offer better seaming strategies and also offer protected wire chases along the roof ribs.
- The Upper Cabinet Aluminum machined ceiling brackets ONLY (CNC machined from solid 7075 Aluminum). Sold as each or in package qty's with mounting hardware included.
- Please note that you will have to order the extruded aluminum separately. We could stock this but we would have to charge you way more than retail for handling & logistics. So to save you money I send you a cut sheet for each sprinter van bay at the time of order so you can order directly form the manufacturer. We can also send you this beforehand if it's helpful for panning.
- We ended up using 17x of these for our build. That's entirely down the drivers side and to the slider door on the passengers side for a Sprinter 144.
- Important Note: the extrusions in the very last back bay and the very front bay are designed to terminate on our Front & Rear angle support brackets at the headliner roof rib in the front of the van and the D-Pillar at the rear of the van. These machined brackets will not work on those surfaces as the angles are different and if you use something other than our transitions you'll need to figure out how to terminate them there yourself.
- The front and rear support angle brackets (Rib Transition Supports) that solve one of the most complicated parts of a sprinter van roof panel build.
The Sprinter 144 Full Kit & Caboodle comes with all the pieces listed above with quantity 17x of the Upper Cabinet Aluminum Machined Ceiling Brackets which covers the entire drivers sides as well as to the sliding door on the passengers side. If you need more or less of these brackets in the kit please reach out.
This kit not only gives you super strong, structural anchor points, but also allows you to use thinner paneling with reduced risk to warping over the transitions from roof rib to roof rib.
You can buy the entire kit or the individual parts if that works better for your build. Please be sure to read the detailed information below before ordering!
More information coming soon... right now only the front & rear transition pieces are for sale & these will work for both 144 & 170WB vans.
**Compatibility: The kits work ONLY for 2014+ Sprinter (NCV3 & VS30) Vans right now.
Key Features
Installation Information
Testimonials
Absolutely stunning, from the shipping and delivery to the impeccable packaging and identification of the parts. I installed in about ten minutes with the video which was linked to my phone via the QR code included in the kit.. Can't say enough about the fit and finish of this kit. Very reasonable price too when you consider all of the extras.
David L.
Hood Strut Kit Review
The mounting system works great. I originally installed my MaxxAir fan with sheet metal screws but opted to replace it with with this and glad I did.
Michael O.
MaxxFan Interior Mounting Kit
Star Rating5 out of 5 starsDescriptionVery well built, the fact that the harness came with everything you need for a clean and easy look and install deserves more than five stars. Thank you!
Lulian T.
Sprinter Horn Upgrade Kit Reivew
Follow us @moonraker.design.studio
Feeling Social?
Follow us on Instagram for our latest news, content & more...