
Sprinter Van Hood Strut Kit
What's Included?
- 2x premium Moonraker Design Gas Struts, specifcally spec'd for the Sprinter Hood.
- 2x CNC machined 6061 Lower Brackets
- A small packet of anti-seize
- The Lower Bracket Ball Stud HW Kit
- The Upper Hood HW Kit
- Screws & Washers to replace the OEM bolts for a completed clean look.
Tools Required
- Socket Driver with 10mm Socket (to remove factory screws)
- 13mm wrench or socket
- 1/2" wrench or socket
- T30 Torx Driver
- A small flat head screwdriver or pry device
- Something or someone to support the hood (if you use someone make sure they like you a lot or that you work fast).
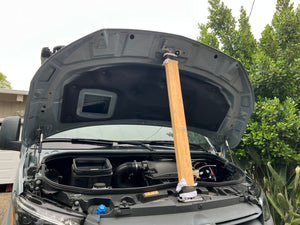
Step #1 Support Your Hood
Pop the hood and support it. We used a 2x4 cut to 38" long with cloth taped on either end to protect the paint. You can also use a friend if you have one of those and they are willing to sacrifice their arms for 10-15 minutes, but they probably won't be your friend afterwards... just saying...

Step #2 Pre-Assemble the Lower Brackets & Ball Studs
Pre-assemble the black ball studs and hardware to the Lower Brackets using a 1/2" wrench or socket and a 13mm wrench or socket.
It's less critical on these screws because the black oxide helps prevent galling for these parts, but we still like to dab a little bit of anti-seize on each of the threads as a general best practice to support future disassembly if the need would arise. A little bit goes a long way and the stuff seems to get everywhere so have some small towels or something to wipe it off handy.
The assembly order is:
- Ball Stud
- Bracket
- Washer
- Nylock Nut
The ball stud points the opposite direction from the bracket L-shape.
Step #3 Remove the Factory Stilt Leg & Clip
With the hood popped you can remove the factory stilt leg and clip. The upper clip is removed with a small flat head screwdriver pressing in the little lever on it and twisting it out. For the actual stilt leg you should remove the metal bar first, followed by squeezing on the plastic clip that’s left behind and pushing it out. We detail this a bit better in the installation video linked above.


Step #4 Install The Hood Hardware
Where you pulled the metal stilt out of is where you will be installing your hood hardware. There just so happens to be another one of these holes on the other side of the hood too.
The assembly order here is:
- Ball Stud
- Custom Stepped Washer
- Through the hole in the hood
- Flat Washer
- Nylock Nut
It's VERY important to add a tiny bit of the included anti-seize here as well to the side or nylock nut prior to tightening them together. Since they are same material types they may want to gall & by adding anti-seize it will help prevent this and prevent them from ever seizing up over the life of the van should you ever want to remove them.
They are tightened with the same 1/2" & 13mm wrench or sockets.

Step #5 Install the Lower Bracket Assembly
To install the lower bracket assembly you'll remove the factory screws using a 10mm socket or wrench. We now included a set of T30 torx screws and countersunk washers to replace the factory screws for a clean & more complete look!

