
Rocker Locker Installation Tips
We are working on a full detailed install video, but here's some written tips and important notes in the meantime! Any other questions, as always feel free to reach out.
Rocker Locker Design Change Log
We occasionally update our Rocker Locker based on real world testing & customer feedback. Below is a table of the change log and the dates in which the different versions span. If you have any questions about which version you are install, please contact us directly!
| Revision | Release Date | End Date | Changes |
|---|---|---|---|
| v1.0 | December 2024 | August 2025 | Initial release! |
| v2.0 | August 2025 | November 2025 |
|
| v3.0 | December 2025 | January 2026 | Changed studs from M4 to M5 threads so that nuts for the hinges and the studs are all the same & the rockers ship with universal HW |
| v4.0 | March 2026 | Present |
|
ROCKER LOCKER INSTALLATION
What's in the Box
- Rocker Locker Doors x2
- Drill and cut templates x2
- 1 small vial of blue loctite - used on the Trim Ring bolts for anti-gall lubricant & thread-locking.
- Sealed Door Compression Locks x2
- M4 (REV3 Kits changed to M5) Nylock Nuts for Mounting x24
- M5 Nylock Nuts for Hinge Mounting x16
- Door Hinges x 4
- Anti Seize for door hinge studs
- Internal Rear Universal Trim Ring x2
- Internal Stiffener Trim Ring (1 Driver & 1 Passenger Side)
- Rocker Locker Trim Rings (1 Driver & 1 Passenger Side)
Tools Required
- Fine Tip Sharpie or other fine tip marker
- Centerpunch
- Power drill with sharp drill bits/Step Bit
- Airsaw (our preference) or jigsaw with fine tooth metal cutting blades
- Philips screw driver for the compression latch.
- 8mm wrench/socket for tightening the hinge nuts.
- 11/32" wrench/socket if your kit was shipped before August 2025
- A 7mm wrench/socket if your kit was shipped from September 2025 - November 2025
- A 8mm wrench/socket if your kit was December 2025 - REV3
- Painters Tape
- Masking paper can be helpful
- Isopropyl Alcohol to clean inside cavities
- Paper towels or shop rags for cleaning the wax from the inside cavity
- Black Spray paint if you want to paint the inside
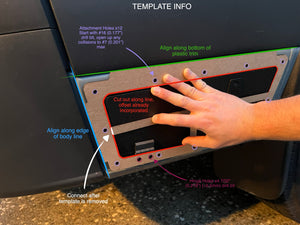
Updated Drill and Cut Template
Rather than using the inner pieces as the template we've now included 2 think cardboard templates. Why 2? Well just in case one gets damaged on the first side. The first image below is for REV1 & REV2 Rocker lockers manufactured before November 2025. The second image is REV3 manufactured December 2025 onward.
!IMPORTANT: Once the locations are marked it's very important that you follow proper drilling best practices to ensure holes are centered and in the correct place. There is not a lot of margin for error here, so if you don't feel comfortable or confident or have the right tools, professional installation is highly recommended. Moonraker Design Co. will not be held responsible for incorrect installation.
- Centerpunch each hole location
- Center drill or pilot drill with a nice sharp small split tip cobalt drill or purpose made center drill.
- Drill to size using the recommended drill sizes below.
- Debur the front & most importantly back side of the hole.
- Apply anti-corrosion treatment after test fitting. Our preferred is Rust Bullet.
REV 2 Drilling Instructions - December 2024 - November 2025
Use the below information for REV1 & REV2 Parts
REV 3 Drilling Instructions - December 2025 - Present
Use the below information for REV3 & REV4 Parts

Cutting the Hole
The correct offset is already incorporated if you cut along the inside of the templates. We added support ribs on the template to stiffen it up. So after you mark as much as you can you will need to connect the lines with a straight edge to get a full perimeter cut line.
Once the line has been drawing you'll want to drill close to each of the four corners to give you space to insert your Airsaw or Jigsaw blade. It can also help if you apply painters tape around the outside of the cutline to protect the paint. It will be covered with the trim ring, but it's still good practice to keep the paint intact whenever possible. If you do scruff or scratch the paint be sure to apply a rust preventative paint over those areas prior to installing the trim ring.

Once you've drilled the corner pilot holes you can use an air saw (our choice) or a jig saw to start at each corner and cut along the lines. Take your time to make straight cuts and cut right along the line since again the offset has been incorporated into the template already. You can also come back and clean up the corners once a majority of the piece is removed.

Next you will drill the holes for the studs. Depending on which revision you have (measure the diameter of your studs and follow the template suggestions above) you will either drill your holes out to 0.177" start to 0.201". max or 0.218" start to 0.250" max. Always follow best drilling practices:
- Center Punch
- Pilot Drill
- Drill to size
- Debur
Once you've cut the hole and drilled all the mounting holes be sure to check fitment. You may need to open up some of the stud holes slightly to get the trim ring to seat fully. Take note of which ones are hitting the metal and slowly increase their sizes until the trim ring is able to be fully seated. Once it's seated fully, make sure there are no visible edges from the center hole. If there are grind/sand or cut those back until they no longer show. Then finally use a grinder, sander or file to smooth all sharp edges and treat with rust preventative paint.

Once you are able to fully seat the trim ring, make sure there are no visible edges from the center hole with the trim ring in place. If there are grind/sand or cut those back until they no longer show. Then finally use a grinder, sander or file to smooth all sharp edges and treat with rust preventative paint.
Mounting the Trim
AGAIN... Make sure you add proper rust preventative measures to all drilled holes and cut metal. Our preferred product for this is Rust Bullet, it's by far the most durable and best paint we've tested with the only draw back being the 2 hour dry time. We put together at YT Short showing all the supplies we use for this.
If you would like further rust/moisture protection you can bond and seal this trim peice to your van using a Urethane Adhesive like SikaFlex 221. You'd simply tape around the exterior of the locker apply a bead of the Urethane, finger fillet any excess and clean it with mineral spirits or similar. This is an extra step that some customers in harsh climates have taken with good results
The first nut you should put on is the top most front. It's a little more difficult to get started. You can check the video here for how best to do it. (Update as of 04/26/2025 this is a lot easier as the design has been updated after this date to move the location of this screw further out where it's more accessible). All the others are pretty easy. Tighten them all a bit at a time to get a uniform compression of all the pieces together.
Tighten until everything is snug. Be sure not to over tighten our target spec for these nuts is around 1.5 – 2.0 Nm (13 – 18 in-lb)
Mounting the Strike Plates
We added these strike plates to the kit in mid-March 2026. These help with 2 things: First they give a better wear surface for long term latching (this was not a reported problem at all with older kits we are just always looking to improve and make this a life-time-of-the-van product). Second and the most important reason is to make adjusting the compression latch easiser & in the right space with plenty of clearance when opening the door. The strik plate goes on the 3rd and second bolt from from front of the van on the very inside and is attached with the stainless colored

Installing the Hinges
It's important to use the included anti-sieze on each of the hinge studs prior to installing the nuts. This will prevent galling from the same material types. You don't need to add a lot, just a tiny little dab to the end of each before you install them.
**NOTE: Anti-seize is notorious for getting EVERYWHERE, especially if you get it on your fingers so I like it use a small foam applicator or q-tip to put it only where I need it.
Installing the Doors and Locks
I like to install the hinges to the van/trim ring first then attach the door. You'll use the same 8mm wrench to do so and remember to add anti-seize the same as before.
Once the door is attached you can add the compression latch, it's shown how to install it pretty well in our original video here. You may need to adjust the compression latch to get the right compression to seal the door, but don't over compress. The door should be tight and flush all around. Also don't forget to add the seal when putting on the compression latch.
Installing the Gasket Material.
Another good example from the video here on how I do this. I send along plenty of extra so it's best to unroll it and cut it in half, one piece for each side. if you contaminated the surface with any anti-seize or loctite be sure to clean it prior to adding the gasket.
Choose a starting point on one of the vertical edges and work your way around the perimeter. Cut to length at the seam and stick it down.
If you have any questions about this install or if anything is unclear, please reach out we are always happy to help.

